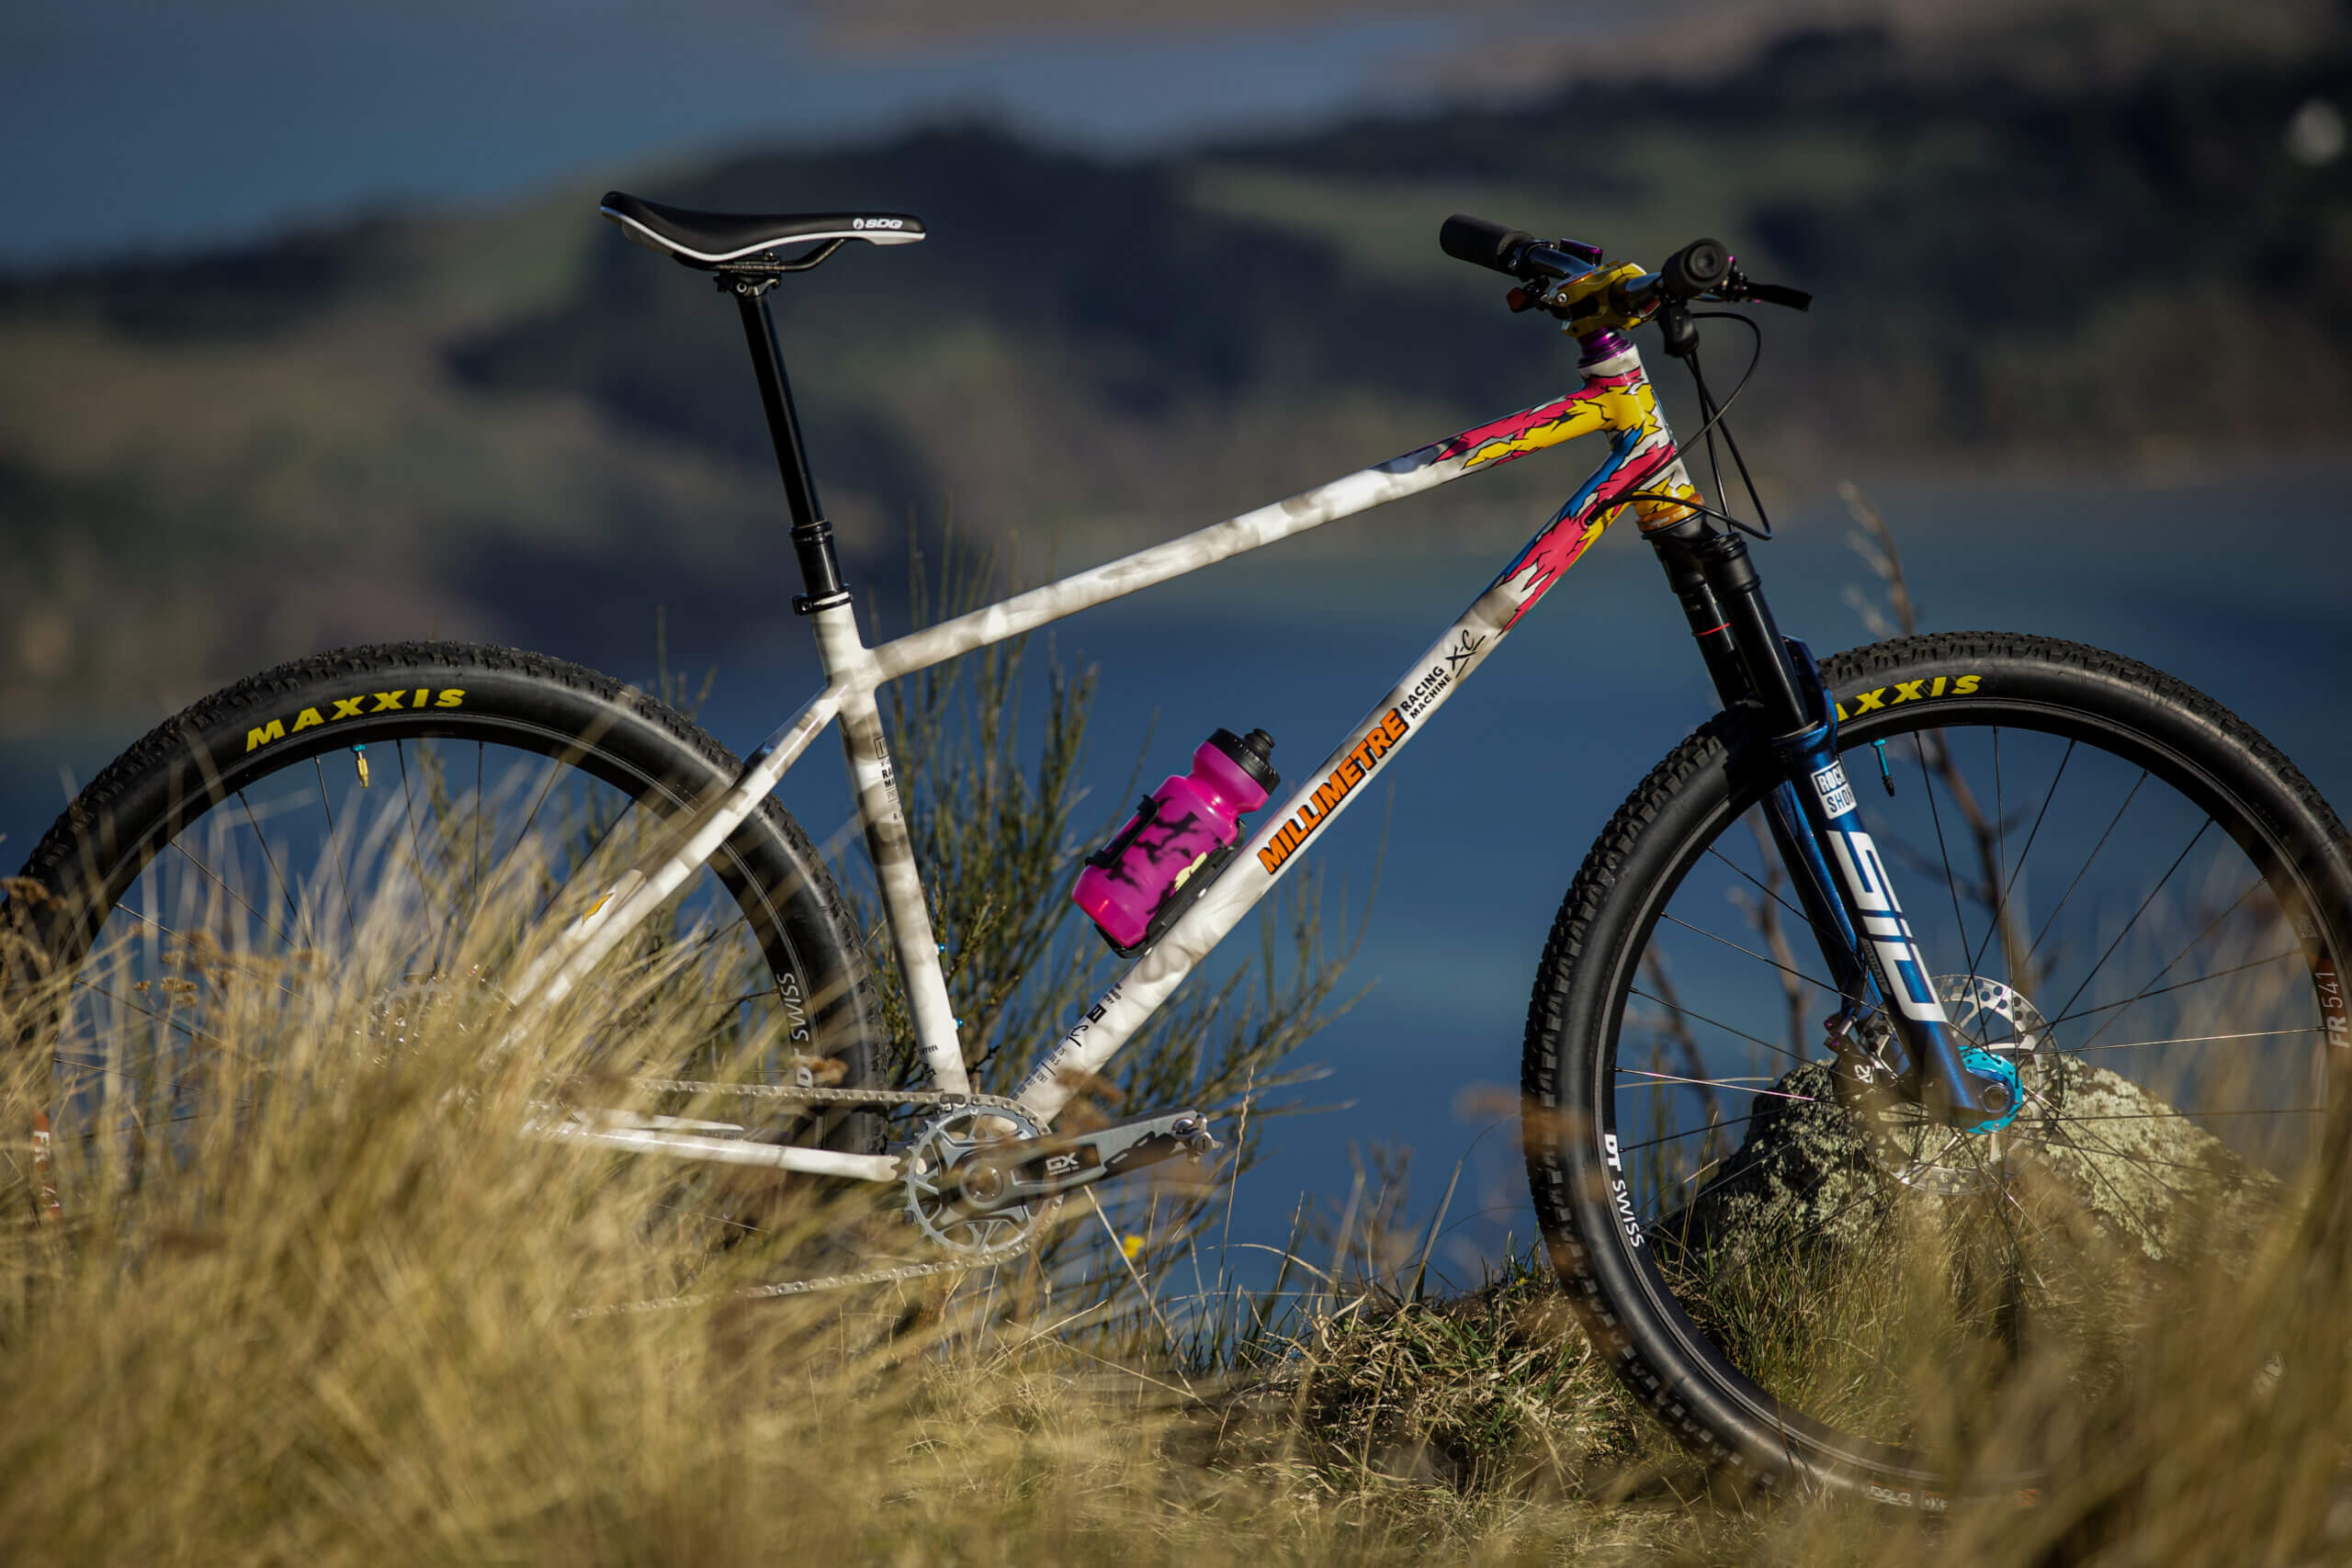
Simon’s RC car-inspired XC Racing Machine
Simon Courtney has been fillet-brazing interesting frames in his Cashmere garage for more than a decade. Starting out with finely finished fixie frames under the name Deflux, he’s since moved on to the world of mountain bikes under the new moniker Millimetre Bikes.
His first project was a big, slack hardtail. You can read the Spoke Magazine write up about it here. The latest project harks back the heyday of cross country racing, when the discipline ruled the roost of mountain bike racing. It was an era that coincided with a ripping about with RC cars for Simon, so it felt natural to leverage that livery for some warm fuzzies of 1990s nostalgia.
Outset sat down with Simon to find out his motivations for building the bike, how he figured out the design, and the secrets behind his amazing paint job.
Q. Why this bike?
A. I didn’t have a cross country bike in my collection of bikes and I really wanted to get more into that sort of thing, just with the sort of riding that I’ve been doing a lot of, like trying to get more kilometres under my belt.
Also cross country racing was where I began my bike journey as a kid, so it’s kind of like, “Well, it’d be cool to have one of those style bikes.”
I’d already built a more extreme-geo hardtail, so I figured let’s push it in the other direction. But I also wanted to do a more fun take on an XC bike. There’s a perception that cross country bikes are a bit more like road racing bikes, but when I grew up it was just about having fun and ripping fast, so I wanted to build a cross country bike that had that fun feeling to it as well.
"There’s a perception that cross country bikes are a bit more like road racing bikes, but when I grew up it was just about having fun and ripping fast."
Q. What sort of difference in feel were you going for with this bike, compared to your more enduro-focused hardtail?
A. I just wanted something that puts me in a bit more of a race position. So, definitely shorter travel, more stretched out, and lower down at the front. My other bike has a lot of stack and I’ve still got good stack height on this bike because I’m a lanky boy at 190cm, but it’s a bit lower.
I also just wanted something that’s built a little bit lighter and that will go across really well as well as up and down – the enduro-style hardtail I built is very much designed to go up and down but not so much across.
Q. When you were building the bike, how did you go about achieving those ride characteristics?
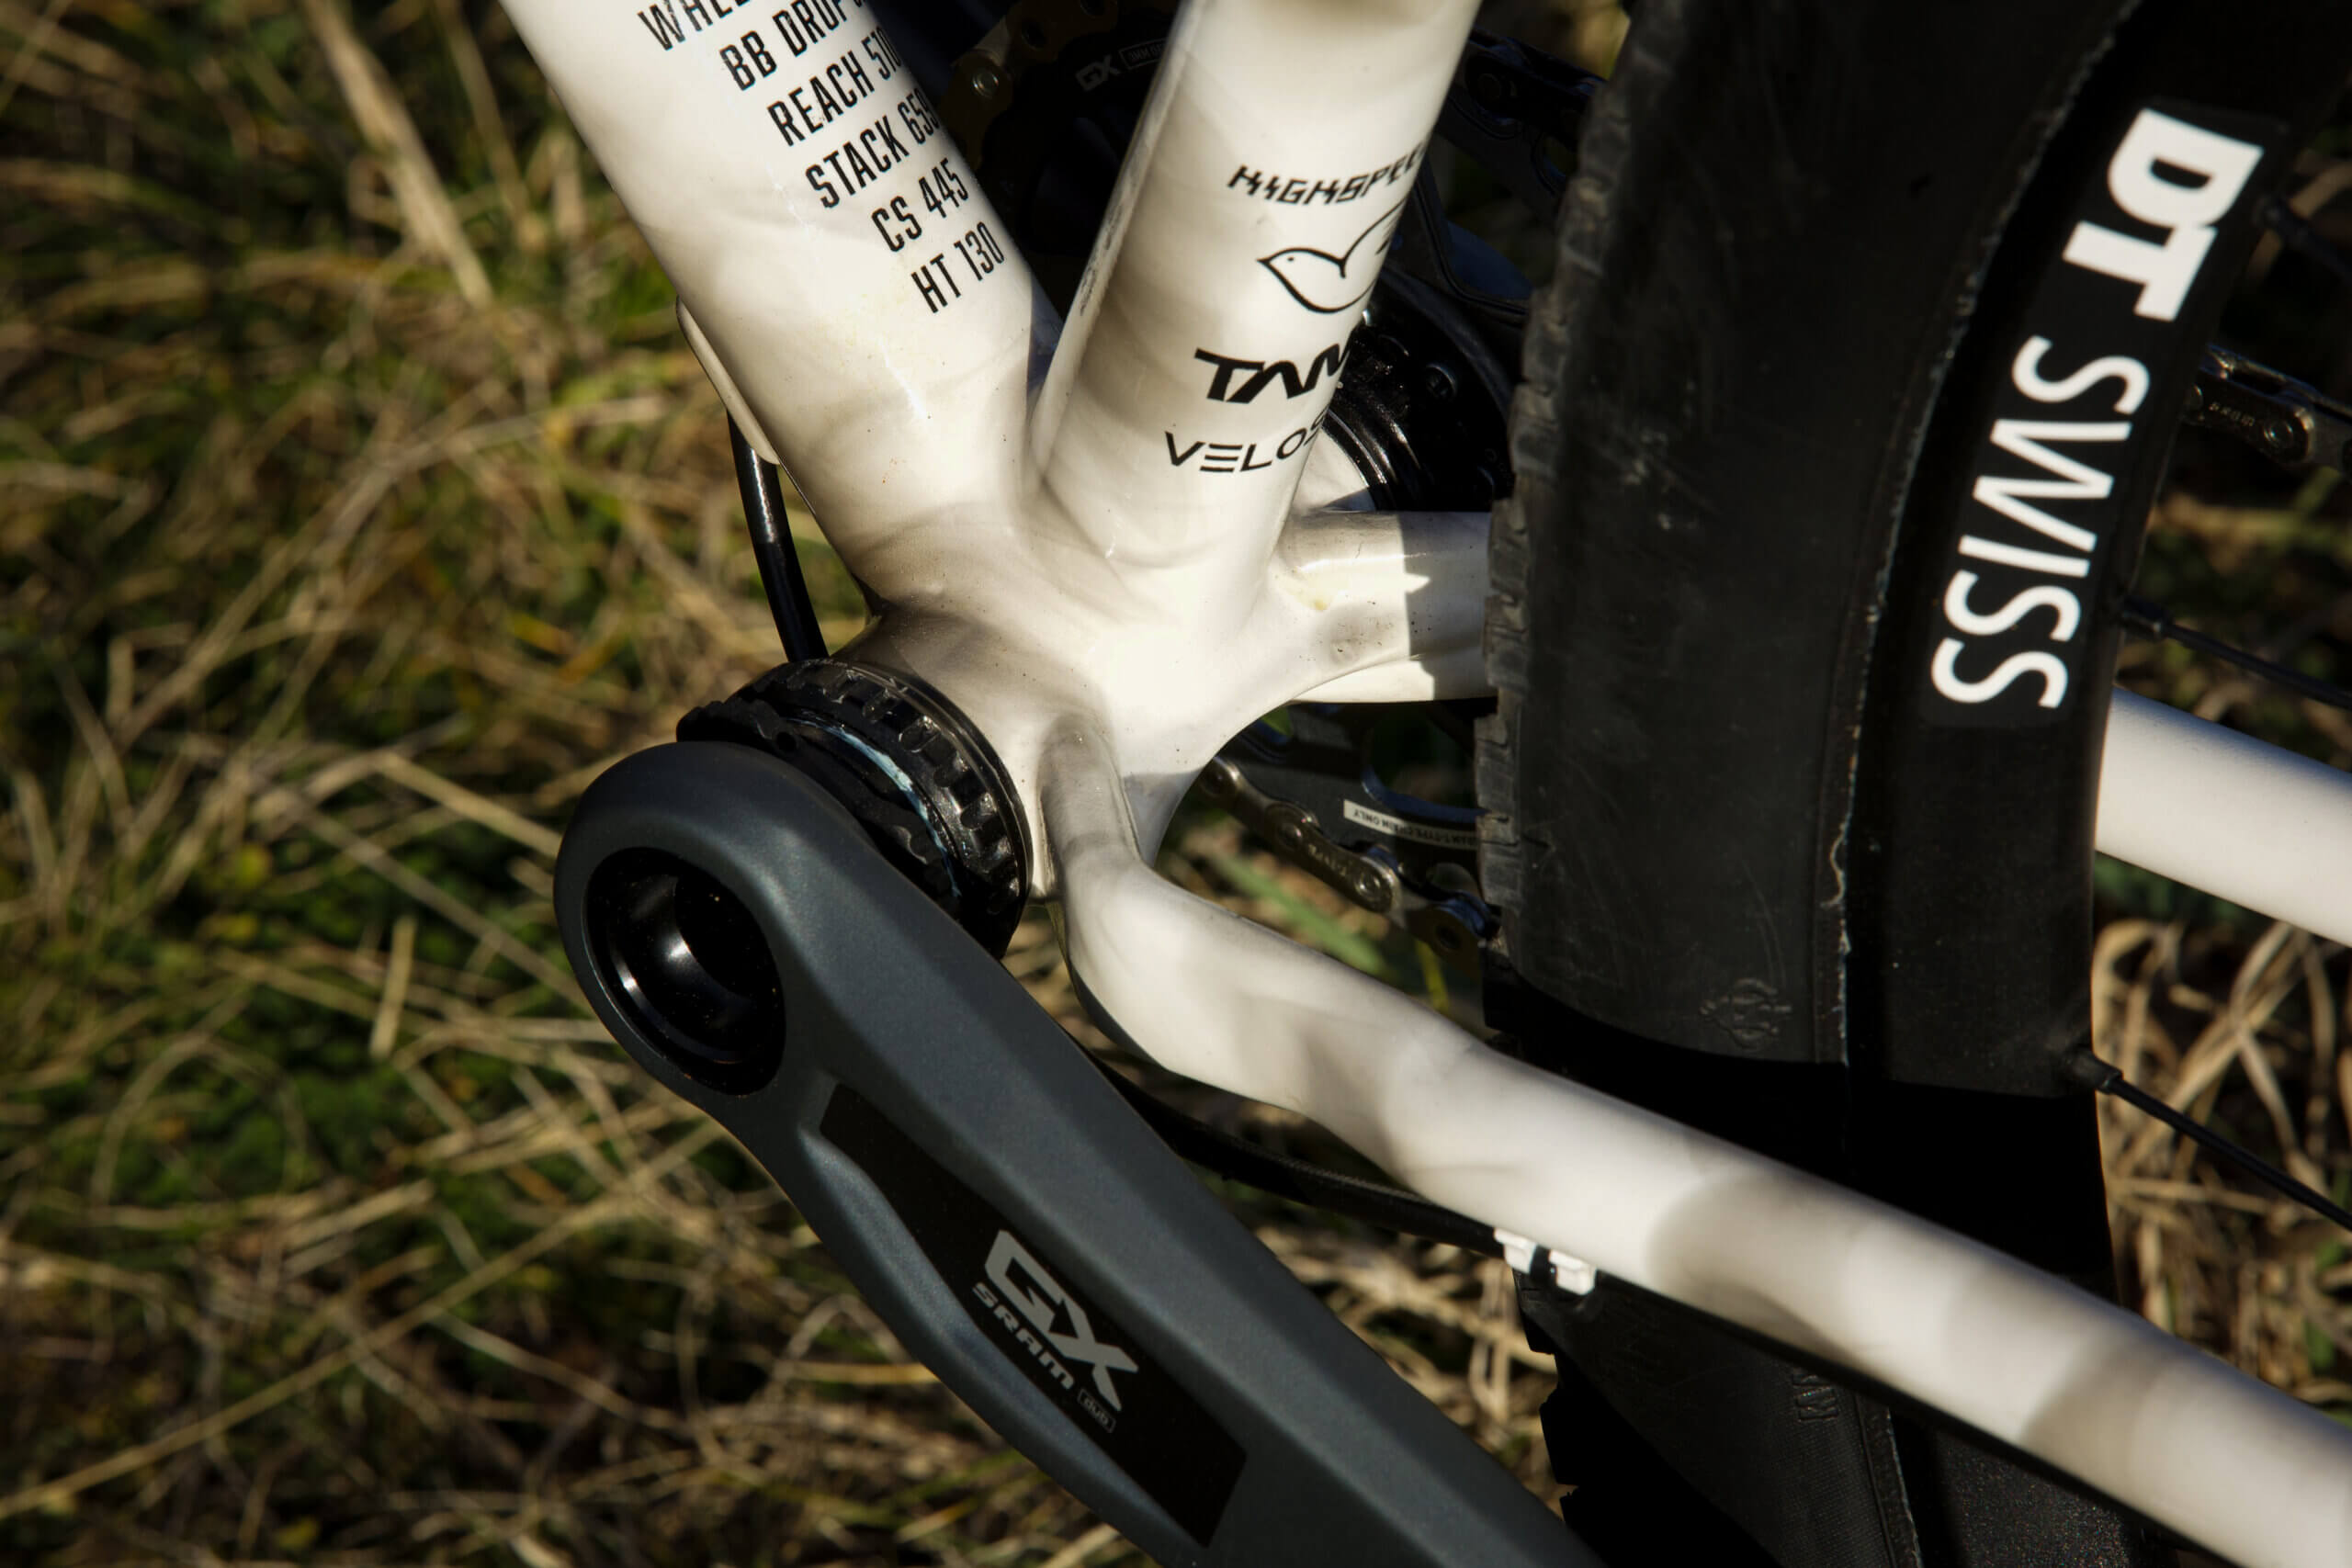
A. I definitely started with the design and the geometry I wanted and then thought about the tube choices. On this frame, I wanted to dip my toes into the world of 3D printing as well. So there are a few design decisions around what was available, because I hadn’t learned the programs to do my own 3D-printed parts. So I had to figure out how that chainstay yoke area could work and then translate that into what tubes I could use.
There were a few restrictions around that, but it was mainly about getting the geometry to work with the tubes that were available and balancing the weight with the length of tubes I wanted.
I started with the fork and worked backwards. So obviously, with the amount of travel that I have on this, it’s quite different as well.
Q. What’s an example of where you’ve made a decision around using a particular type of tube to achieve a ride characteristic?
A. The top tube diameter changes along its length, so it tapers from the head tube to the seat tube. The idea was to keep the strength at the heat tube end while hopefully making it a little bit more compliant at the seat tube.
Q. You’ve fillet brazed this frame. Why did you go for that method of joining tubes?
A. It’s the type of welding I’m skilled at doing, but I also enjoy the aesthetic of fillet brazing – it reminds me of all the cool bikes I grew up with, like the old Kleins and Cannondales. I just love the fluid look of how the tubes on those bikes meld together, but they still feel like metal bikes.
Q. What kind of geometry numbers did you go for to achieve that more cross-country feel?
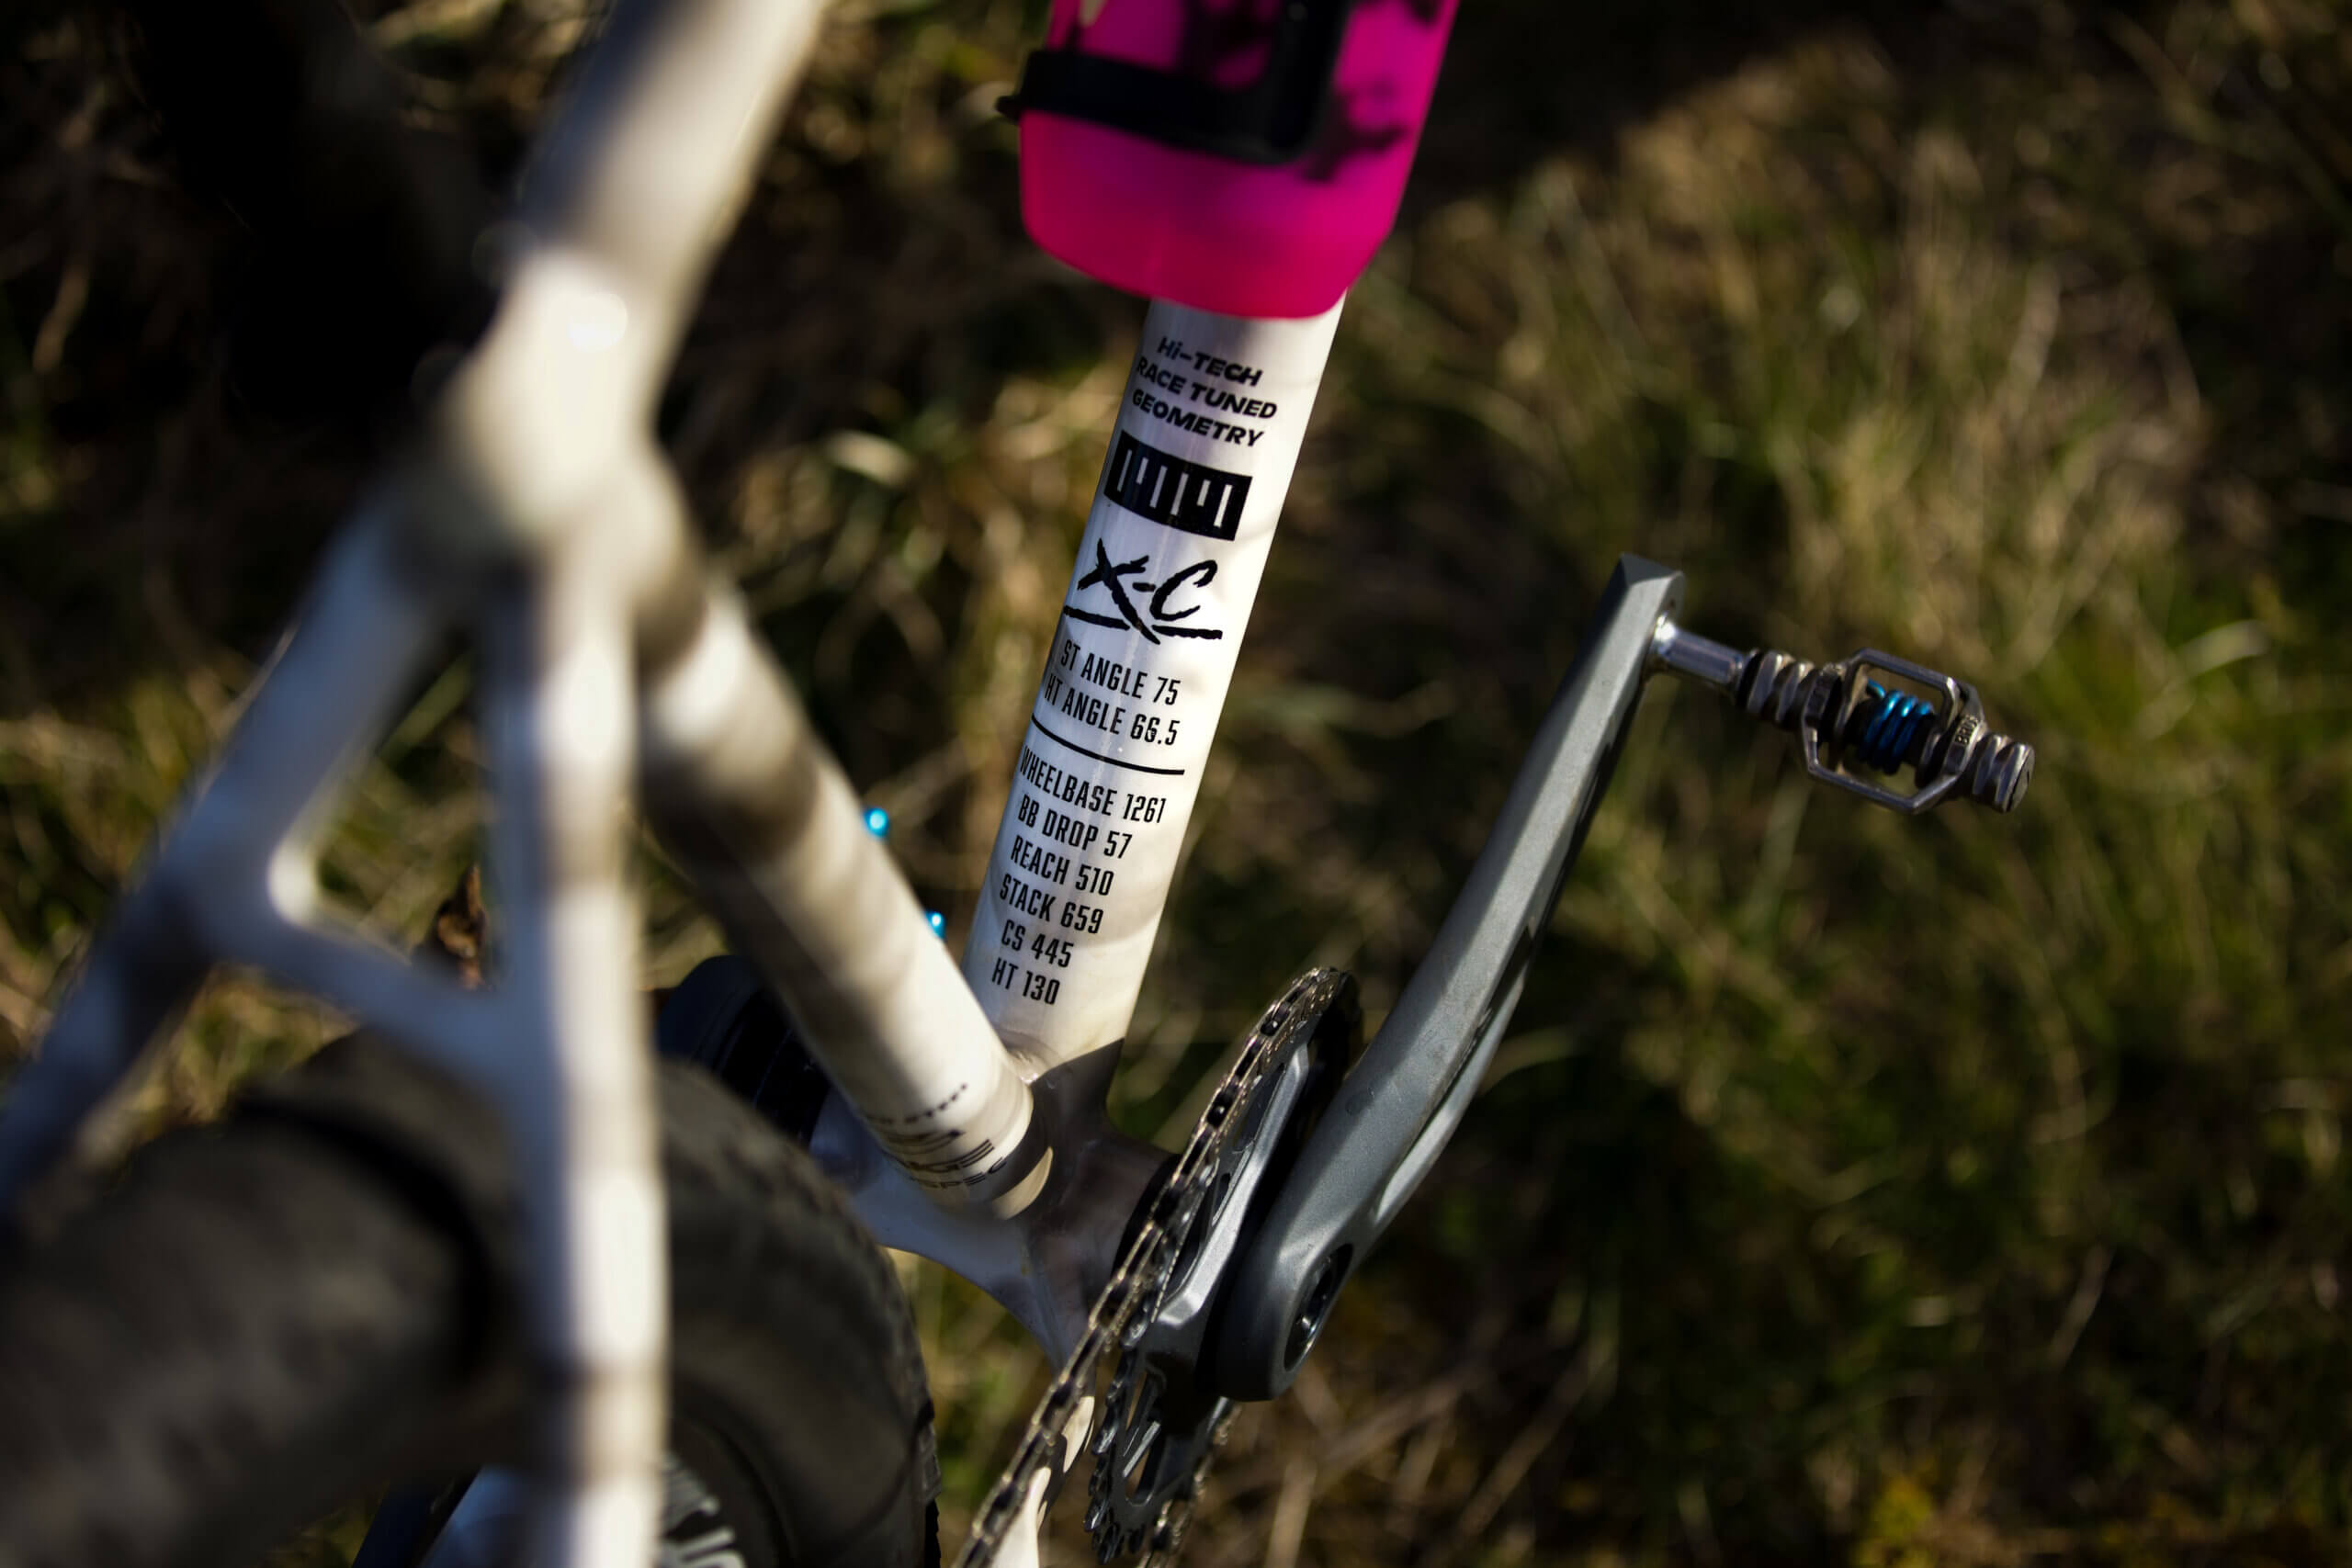
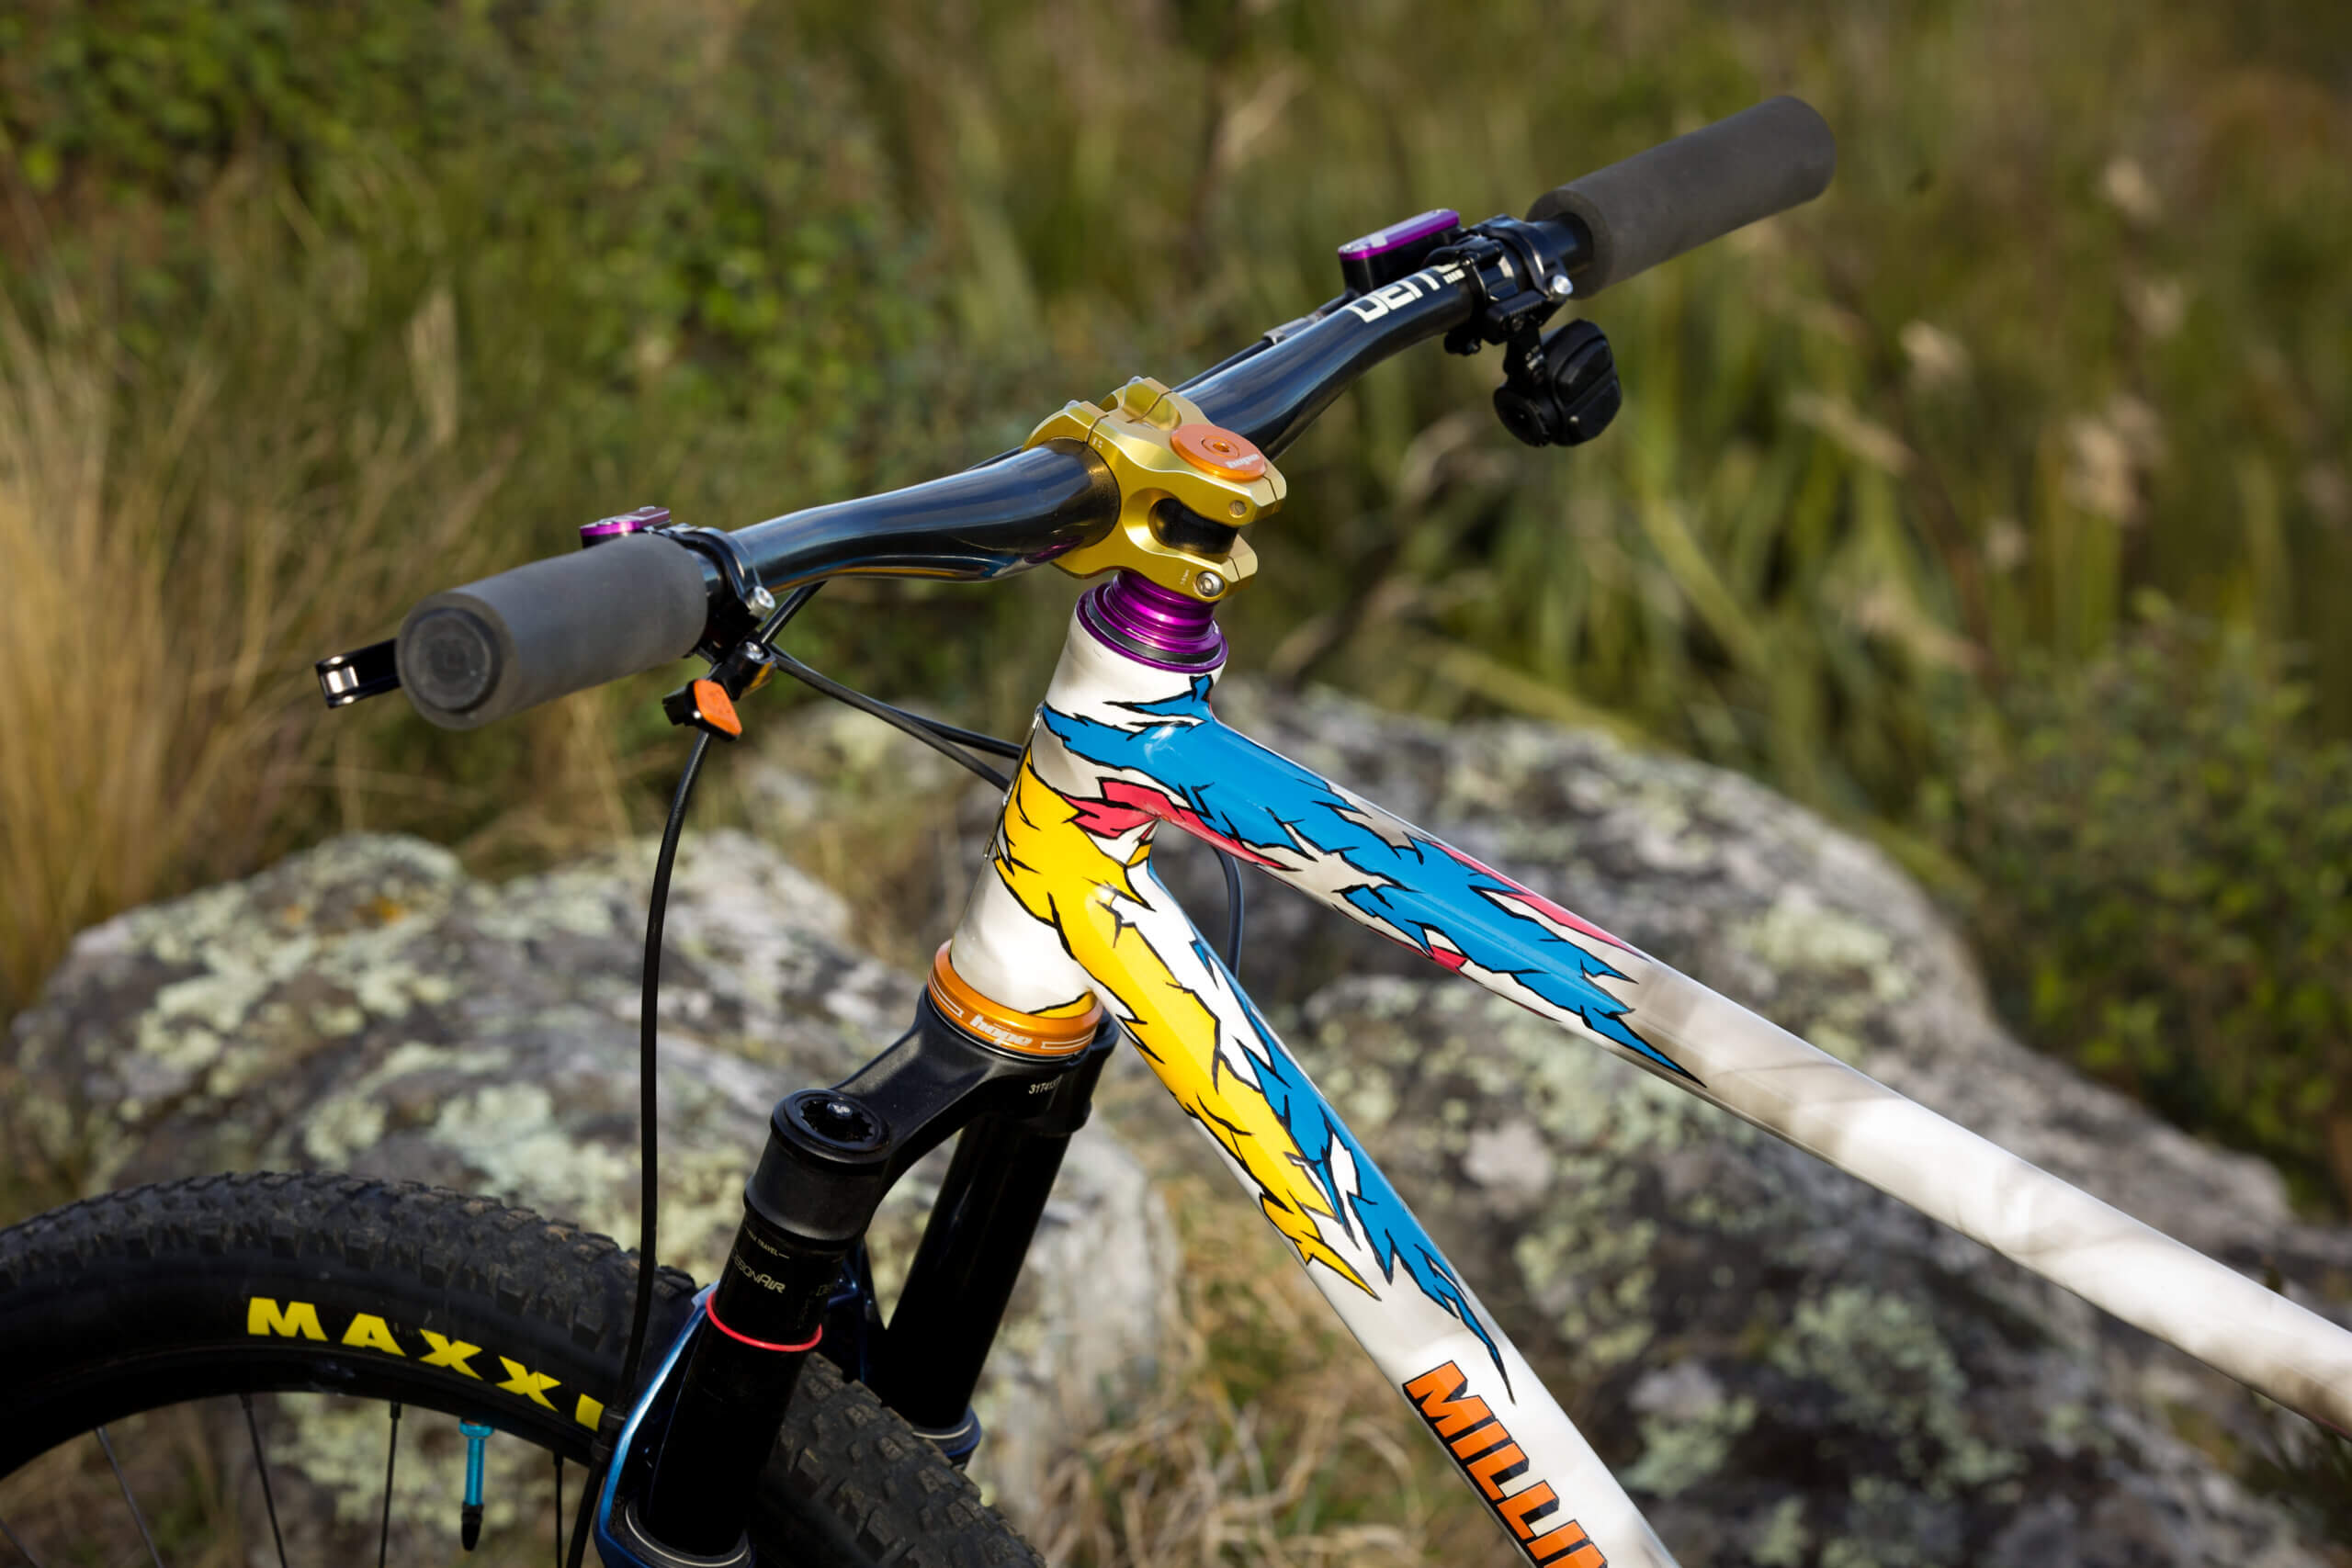
A. I started with the stack height after I figured out which fork I was going to use. That’s fairly high, still, at 659mm. I went for a shorter and steeper head tube of 130mm and 66-degrees on this compared to my enduro hardtail. Also the length of the chainstays really affects where I’m positioned on the bike, so I shortened those up a bit to 445mm. I also opted for a slightly more relaxed seat tube angle of 75 degrees static. I appreciate quite a steep seat tube – because I’m tall, I tend to end up with the seat post too far over the rear axle with slack seat tubes. And then, because I wanted to be a bit more forward on this bike, I’ve kept it long out front with a reach of 510mm.
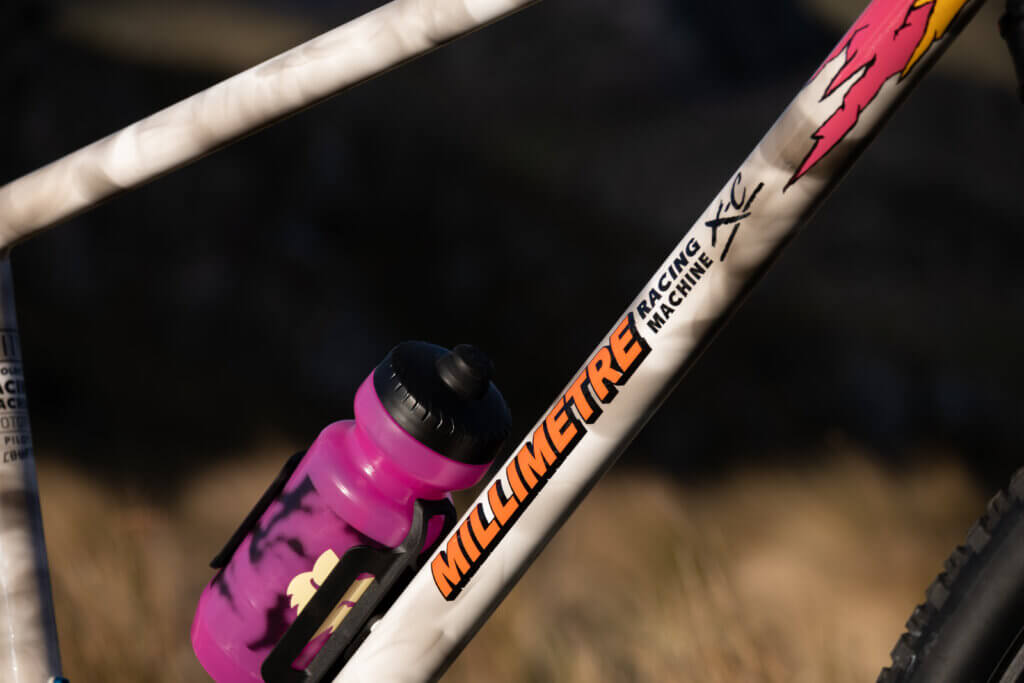
I actually painted the geometry numbers straight onto the down tube. I kind of did that for myself because I play with so many numbers and so many designs that I tend to forget exactly what I’ve done by the time I’ve built it all up.
Q. That brings us nicely onto the epic paint job. Tell us the story behind the custom paint?
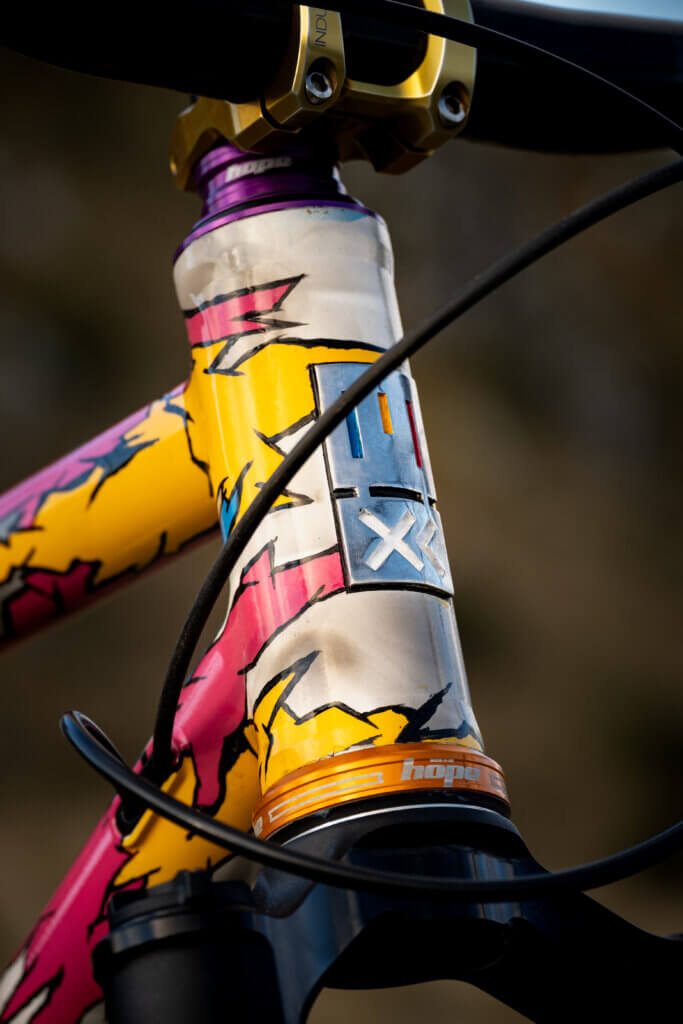
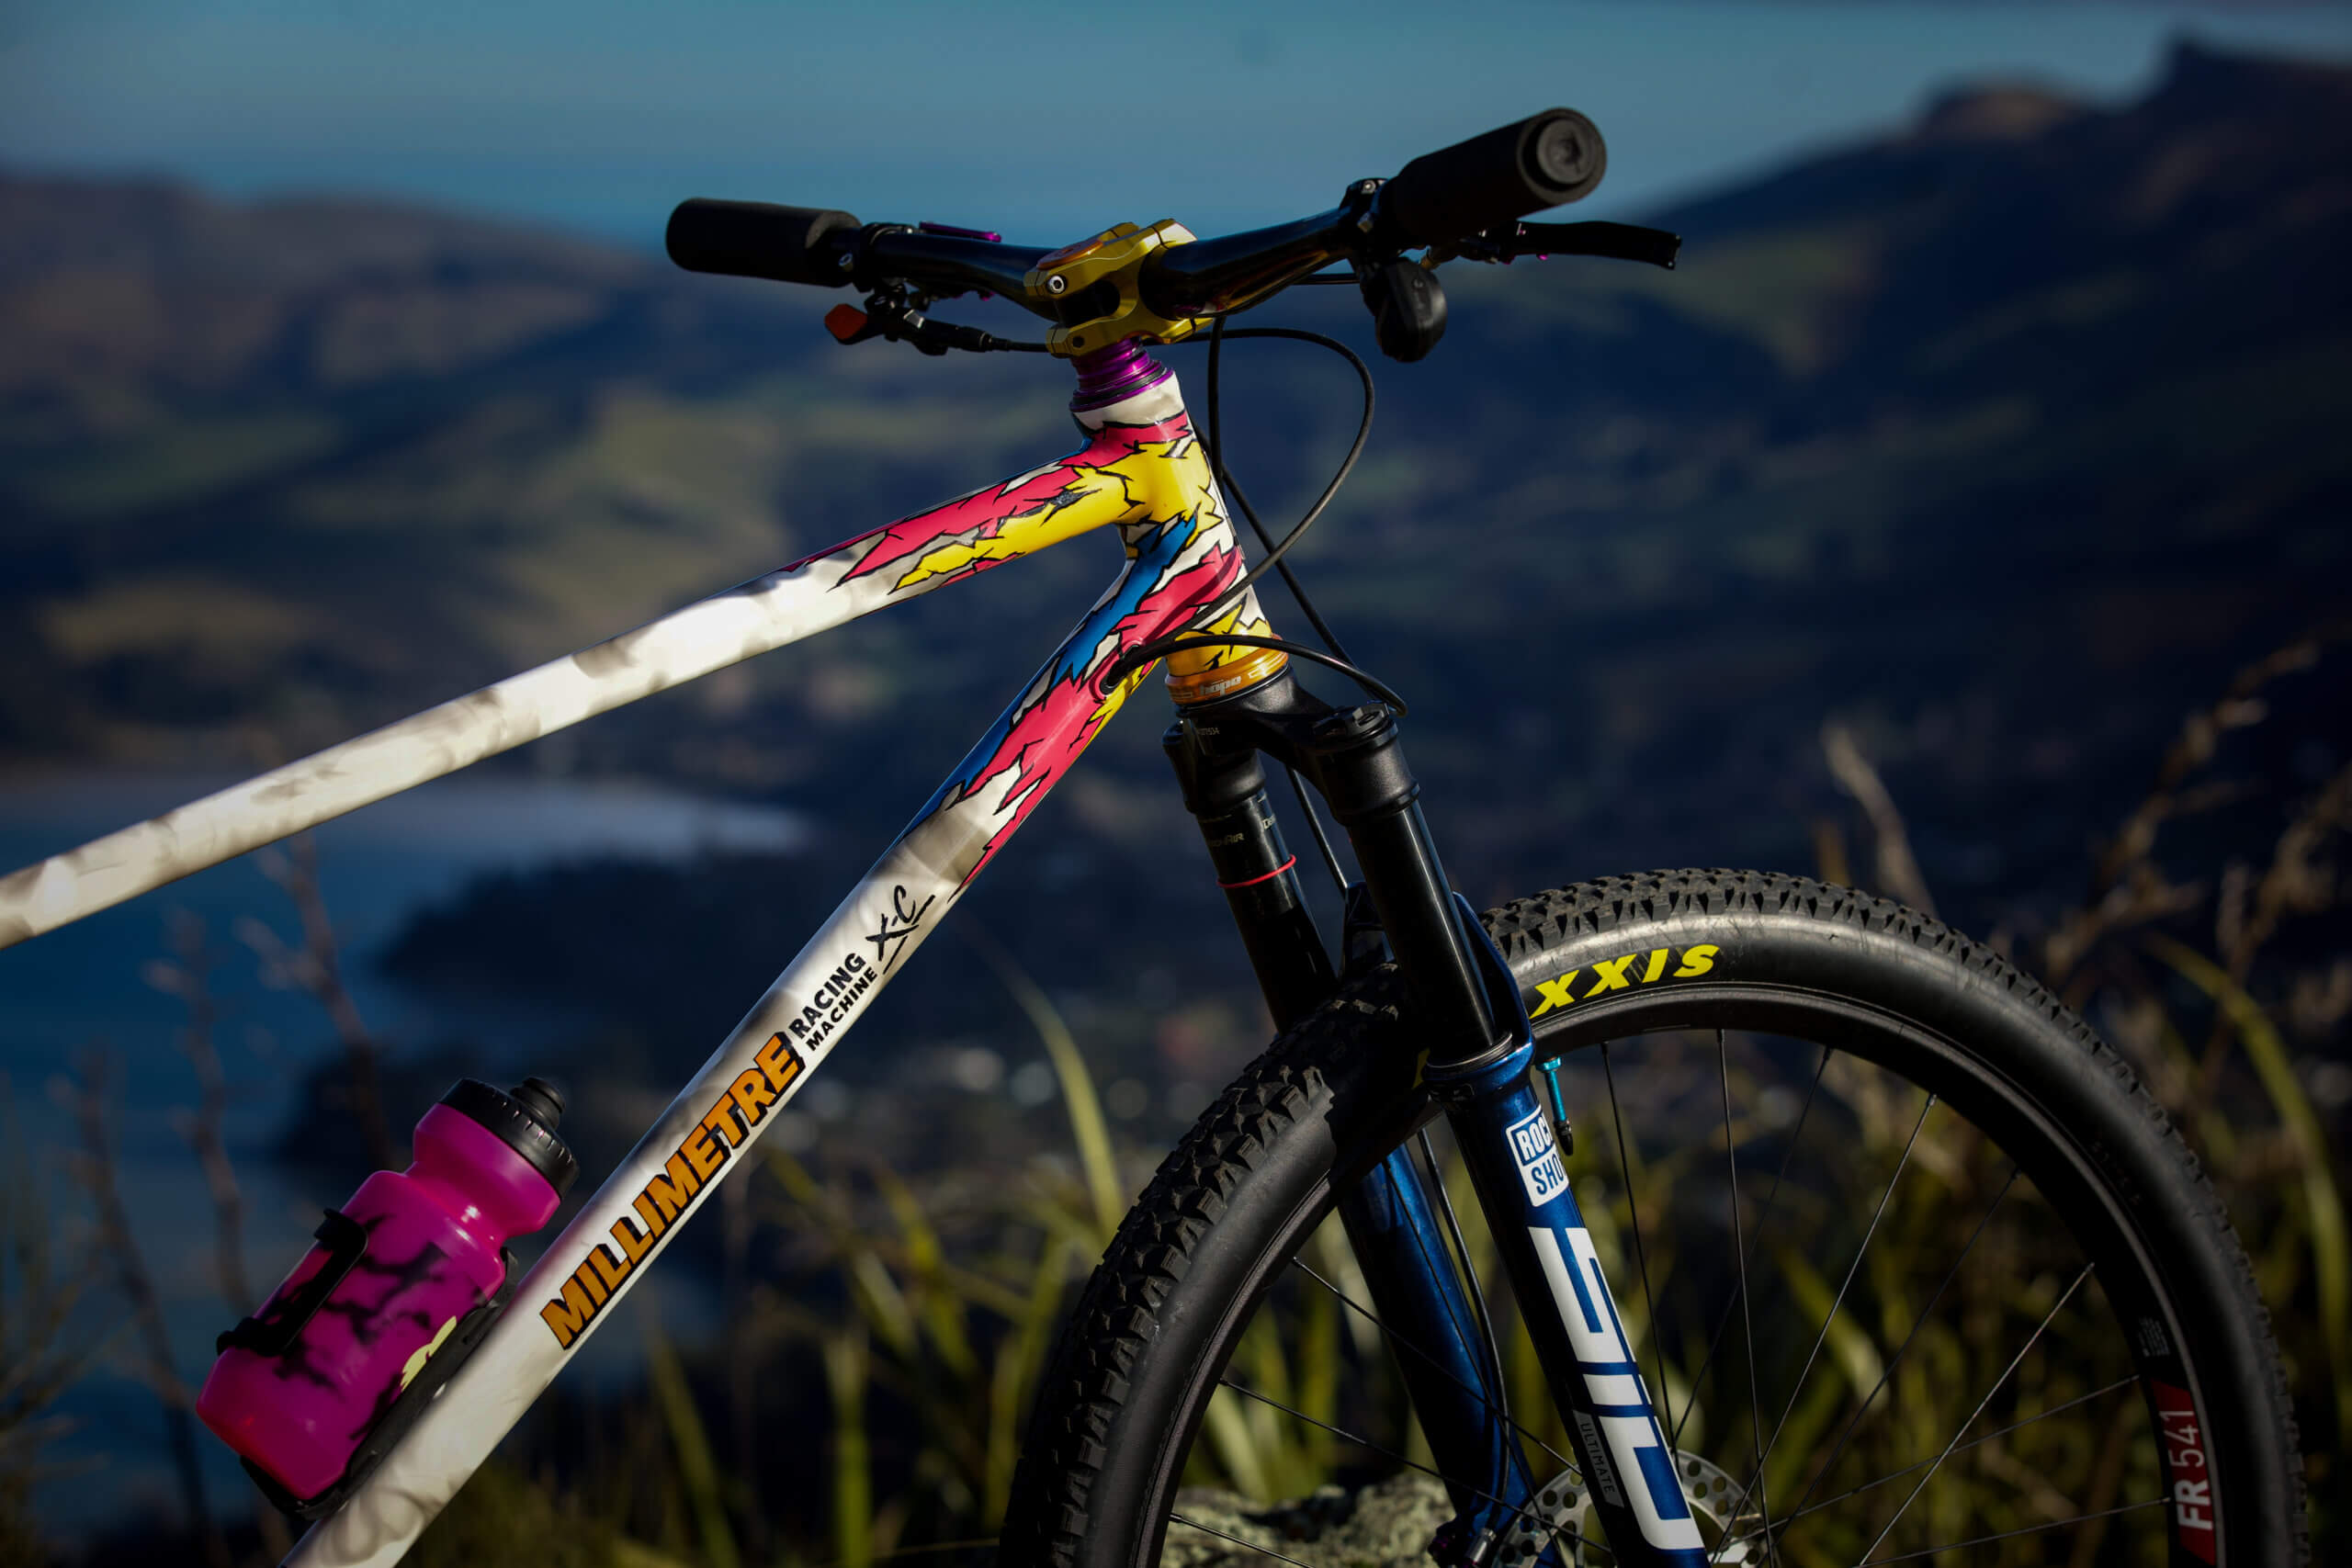
A. I’ve always wanted a cross country bike that took me back to when I was a kid, back to when the paint jobs were a bit more exciting.
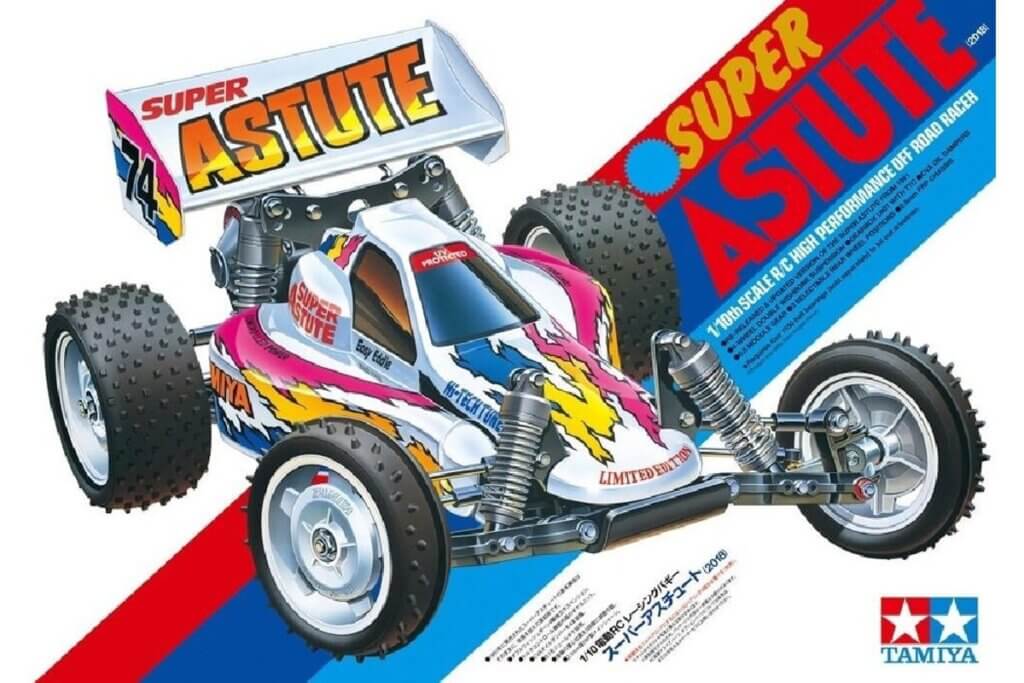
I really enjoy my radio control cars and one of the cool old Tamiya cars that I love is the Super Astute. The paint job of that had the radical vibe that I really wanted, so I kind of ran with that. And then I always wanted to play with a smoke paint job on a bike. So it’s like, “Well, how do I combine these two? Let’s just use the white backdrop and smoke it up.”
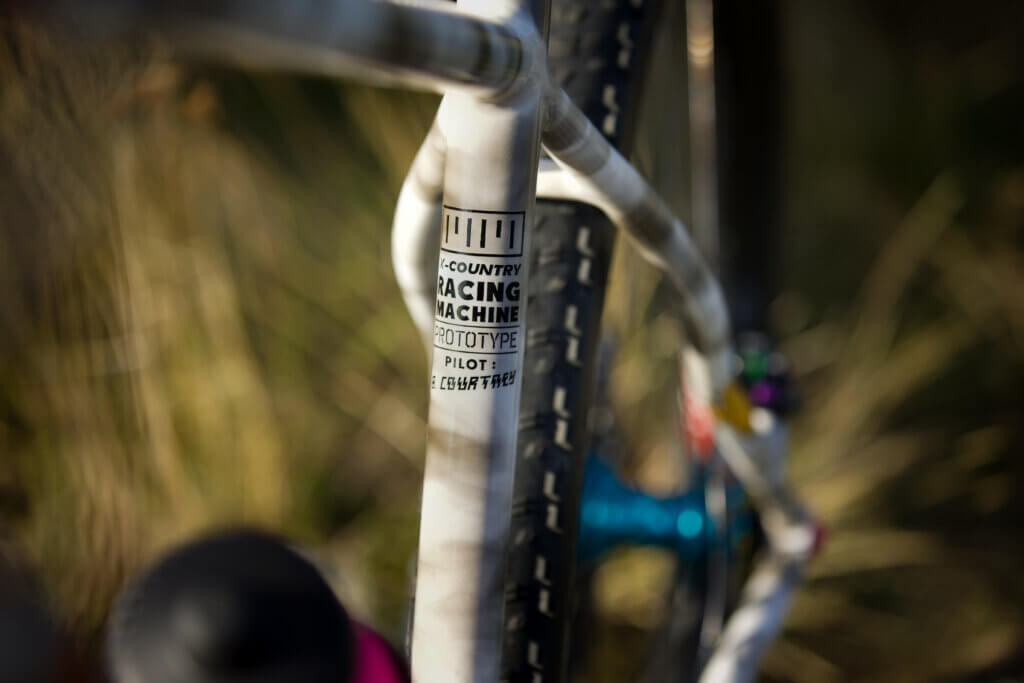
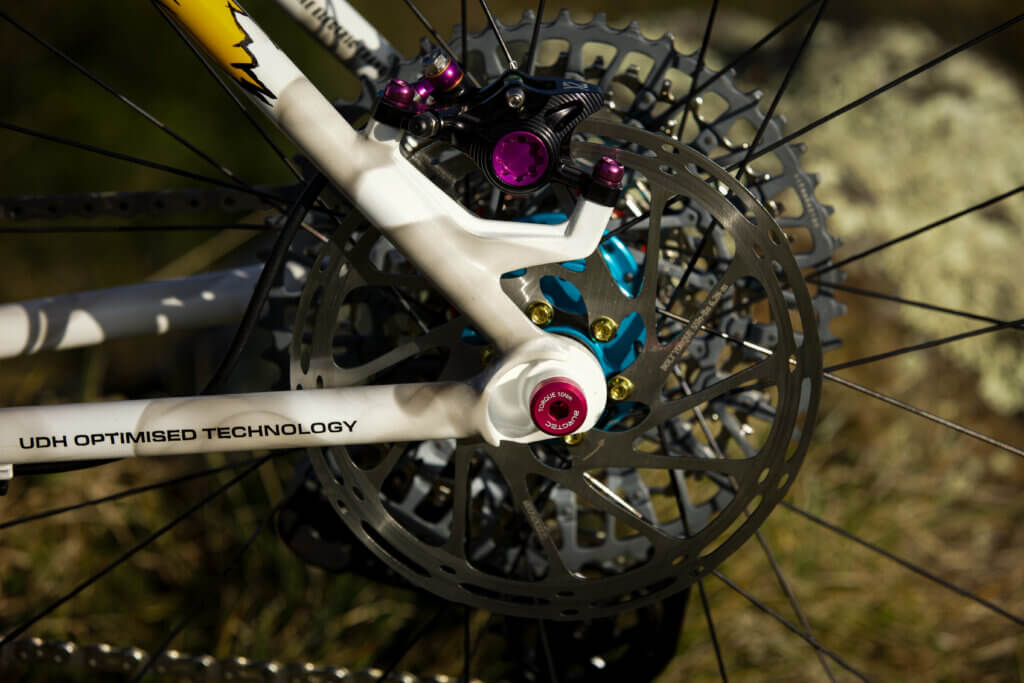
I’m not a big fan of decals, so I really wanted to paint all the graphics on it. I wanted the graphics to be a nod to the old hardtail bikes that had decals about all the little frame features, so I’ve got graphics like “UDH Optimised Technology”. It’s a tongue-in-cheek nod to those 90s and 2000s bikes.
Q. How did you achieve the smoke effect?
A. It’s pretty simple. I use LPG and oxygen with a gas torch for brazing, so I just lit up the torch and left it exclusively on the LPG, which creates quite a sooty flame. Then I sort of just moved the torch over the white paint in a few ways and it left this effect of the sooty smoke. Then I hit it with a clear coat to lock it all in. It’s surprising how well the soot stays on the paint.
Q. And the graphics you painted on, were they done with stencils?
A. Yeah, those were all masked out with stencils. I’m pretty proficient with spray cans and stenciling from all my years of doing that sort of artwork, so I felt pretty confident that I could keep it looking crisp. And then I hand painted the black outlines just to get the kind of the brush-like finish.
Why and how did you choose the parts and are you fussy about certain parts?
I’m fussy about everything to a degree and there are a few parts that will change throughout the next couple years.
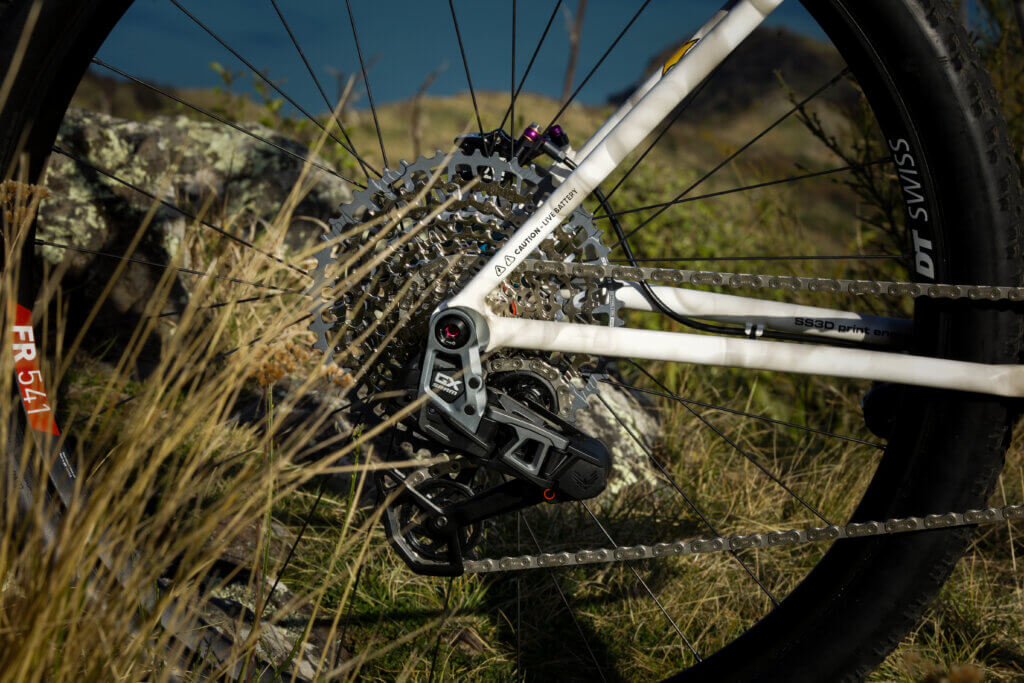
I really just wanted to try out building a bike that would work with some of the newer technology, like wireless shifting. I wanted to do a SRAM setup, which obviously fitted with UDH, because I haven’t really built a bike with that yet.
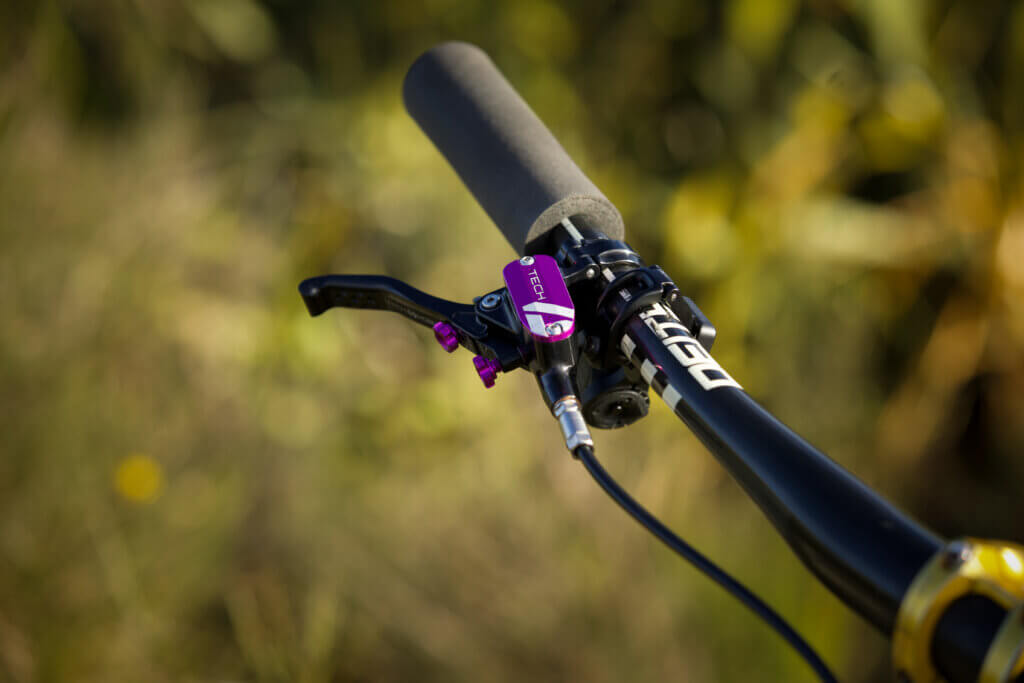
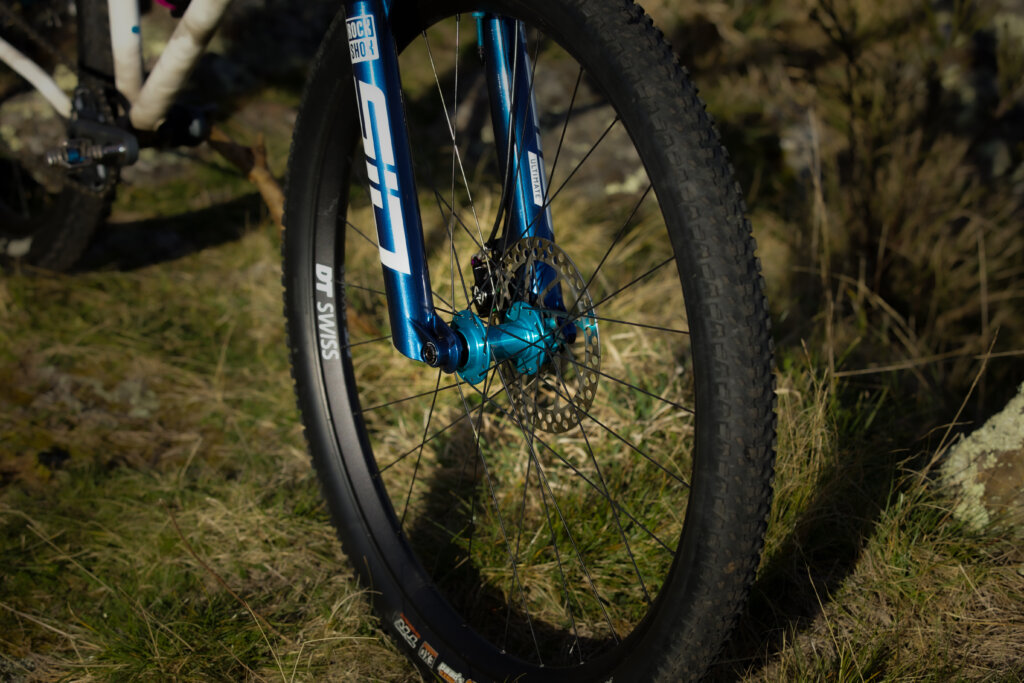
I’ve always liked the RockShox SID fork. And I wanted the fork to sit at 120mm travel, which is definitely where modern cross country bikes are playing. I also wanted foam grips partly because you see them on all the cross country characters’ bikes.
I’ve also gone shorter with the crank length on this at 165mm because I wanted to try a faster cadence.
Q. What’s your favorite thing about this bike?
A. I love the paint job. I was a bit worried about how it would turn out, so I’m pretty stoked at how it looks. Especially after going through the process of designing and making a frame, you can ruin it with paint.
Follow Simon’s Millimetre Bikes journey here.
Millimetre Bikes XC Racing Machine
Frame
- Tubes: Columbus, Tange, VeloSpec, Paragon Machineworks and a 3D SLM printed stainless yoke.
- Downtube: 38.1mm OD
- Top tube: 34.9mm/28.6mm OD
- Seat tube: EX-Butted 33.5mm/32.7mm OD (for 31.6mm seat post)
- Seat stays: 12.5mm/19mm OD
- Chainstays: 19mm OD
- Bottom bracket: 38.1mm OD
- Head tube: 47.6mm OD (50mm OD flange at ends)
Components
- Fork: Rock Shox SID Ultimate 3P 120mm Blue Crush
- Wheels: Hope Pro 5 hub set turquoise 28 hole / 29-inch DT Swiss FR541 rims
- Tyres: Front: Maxxis Ardent Race 29×2.20. Rear: Maxxis Aspen 29×2.25. (Plan to swap to Vittoria or Schwarble tan walls)
- Derailleur: SRAM GX T-Type Eagle Transmission AXS
- Shifter: SRAM GX T-Type Eagle Transmission AXS
- Crankset: SRAM GX T-Type Eagle Transmission AXS
- Chainring: SRAM GX T-Type Eagle Transmission AXS (Plan to swap to Absolute Black Oval)
- Pedals: Crank Brothers Egg Beaters (Plan to swap to Shimano XT)
- Brakes: Hope Tech 4 X2 black/purple
- Handlebar: Deity 35mm Skywire Carbon 15mm rise
- Stem: Industry Nine’s A35 40mm Gold
- Grips: Wolf Tooth Fat Paw Grips
- Dropper post and lever: Bike Yoke Revive Dropper / OneUp Dropper Leaver with orange grip pad
- Saddle: SDG Bel-air V3 Lux Alloy black/white
- Extras: Hope Headset and a bunch of random anno colours for bolts and bits